Sunday, September 09, 2012

Lead Shapeners


       Graphite leads used in lead holders need to be sharpened from time to time. There are several ways to do it and some techniques to use.

 Unsharpened graphite lead


  Sharpened graphite lead


        The one i most use is the rotary sharpener made for this kind of leads, Some lead holders also include a top button sharpener that can be used to sharpen the lead, also a sand paper block or even a piece of sand paper can be used to sharpen the lead to give it a desire shape, a sharp knife can as well be used to sharpen the graphite lead. I also have seen some kind of little traditional pencil sharpeners adapted for the size of the lead, but never try anyone.
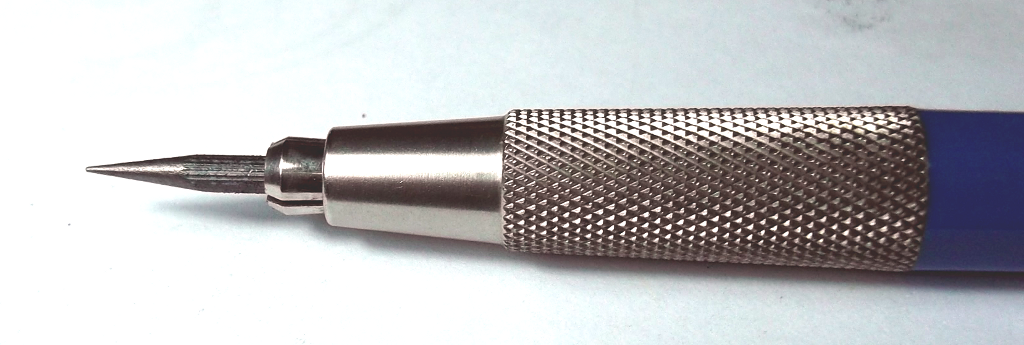

 Rotary Sharpener

 
       The rotary sharpener is made of a cylinder and has 2 holes with different lengths  to measure the size of the lead to be sharpened, a cotton cylinder to clean up the lead after sharpening and a main hole where the lead holder with the lead is placed to be sharpened.

       The 2 Holes define 2 different lengths for the lead, A big one for drawing and a littler one for writing and other softer activities.

       So in order to sharpen a graphite lead with this rotary sharpener you would first select a lead length, then release enough lead on the lead holder and insert the lead in the chosen hole, so the lead reaches the bottom of the hole, then release the holder and let it move in direction of the sharpener surface. 
 Two sizes of graphite lead to be sharpened


       After a size have been selected and the lead holds the correct length as shown in the above picture, insert the lead holder in the upper big hole and while holding the sharpener with one hand and the lead holder with the other hand, start rotating the lead holder around the sharpener until no resistance is sensed. You must be careful, when rotating the lead holder not to apply too much force, or the lead can break, this is more noticeable in the softer/blacker degrees of graphite (B to 6B).


.
Two different lead  tips: for drawing (top) and for writing (bottom)


Replacing the Cotton Cylinder


       One of the things i first thought the first time i saw my rotary sharpener was that the little cotton cylinder that is used to clean the graphite lead tip after it has been sharpened, was not going to last long and would not be easy to replace so it would be a one time use only. Until i noticed that a local store was selling cigarettes filters that could replace them, So i got several types of filters and found one that is the same diameter, only a bit higher that the original one.


Close view of the cotton cylinders. Left to right: Original one, heavily used,  a used  cigarette filter and a clean cigarette filter


 As can be seen, the diameter of the cigarette filter is the same, only the height is a bit bigger


 Using a sharp knife, is just a matter of seconds until we have a new clean cotton cylinder


The final result, looks even better then the original one. :)


Now i have an almost inesgotable source of cotton cylinders for my sharpener :)


Types of lead tips


The lead tip can have several shapes, each one giving a different mark on the paper
 
 Three different lead tip shapes, from left to right: flat, sharp and dull

        The three tips give different marks in the paper, the sharp tip is good for drawing detail as it allows drawing fine lines, the dull tip is good for applying value to an area and the flat tip can be used for both, the flat part can be used as a dull tip for applying value, and the sharp part to draw fine lines.
 
       When using the sharp tip, it is a good practice to keep rotating the lead holder, as it keeps the tip sharpen. It makes the wearing of the graphite more even around the tip. If you do not rotate it constantly it will wear off faster and become a dull or flat tip.

Using sandpaper to sharpen leads


      A sandpaper pad or a little piece of sandpaper can be used to sharpen the leads, specially if you want a flat lead tip. As simple as it can be you just have to move the lead against the sandpaper to get it sharpened, and it can shape different tips  if you keep the lead stationary of if you rotate it.


 Aspect of the used sandpaper pad to sharpen a graphite lead


 Example of a flat graphite tip obtained using a sandpaper pad


 End Cap Lead Sharpener 


       Some lead holders have a end cap lead sharpener, quite useful in a place where you cant get a normal sharpener.

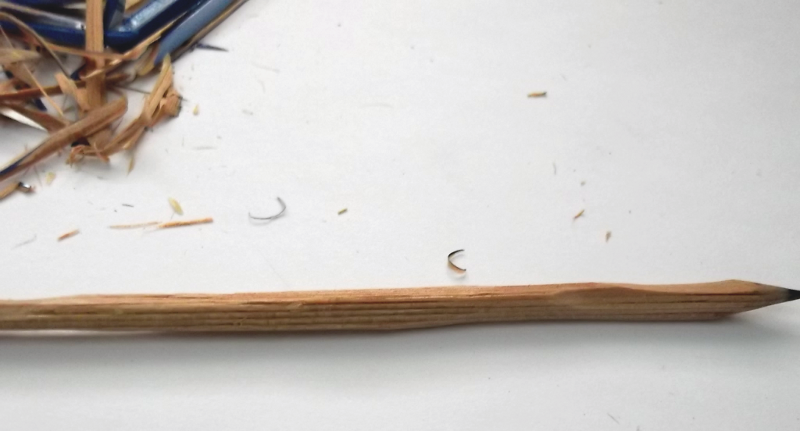
 An end cap lead sharpener and a graphite lead ready to be sharpen


 Inserting the lead into the sharpener and rotate it, Retire the lead for visual inspection and stop rotating it when you feel it is sharpen.

Result of the sharpening operation, a sharpen lead and lots of graphite powder.


        Do not through away the graphite powder that results from the several sharpening operations described above, The rotary sharpener collects the graphite powder in his body, you just have to take off the superior part to get access to the graphite powder. It can be collected in little photographic film plastic containers and later can be used to tone a background of a drawing. With time you will be able to collect a good quantity of graphite powder and save you some money as commercial graphite graphite powder pots can be a bit expensive.


Enjoy drawing!

Sunday, September 02, 2012

How to get a good lead from a pencil


       As we talked in a previous article, it is difficult for me to get good leads for drawing in the local stores, I have used a procedure to get leads easily. If I have access to good drawing wood cased pencils, then I already have graphite leads available, i just have to take off the wood case. It also enable me to get a wider range of degrees to work with using lead holders, 

So we will describe how to get get the leads from the pencils.

      Before you buy a pencil, make sure that the pencil lead is about 2mm in diameter, otherwise the lead holder may not be able to use that lead.


What you need: a pencil and a sharp utility knife


WARNING: Be very careful with the knife!!! It is very sharp and cuts through skin easily. Never use too much force to cut with it, to minimize possible accidents.


       So we would start to carve the top of the pencil with the knife. Put the end of the pencil on the paper and with the knife start to carefully carve sections of the wood of the pencil, with vertical top-down movements.

The first cut


The top end of the pencil carved


       After carving the top end of the pencil, we will proceed with carving the other end of the pencil.So now we put the tip of the pencil on the paper in a vertical position and again carve form top to bottom in the paper direction.

Now start with the other end


The pencil with the top and bottom carved


Detailed views


       Always use an outward movement when carving, from inside to outside, so to avoid any incident that may arise from the knife movement. Use little force to cut the wood, never force it too deep, or it may break the lead. In this case move the knife back, rotate the pencil and start carving in another place.


       Now carve the middle section of the pencil with the same soft smooth knife movement. It should be easier cause we already carved the top and bottom end of the pencil.

First phase completed, most of the wood has been removed


      Now on the second phase we will remove most of the wood from the lead. Using the same approach as the first phase we will carve the top, then the bottom and then the middle section.

Almost finished


       So now, in the last phase, it is a matter of time until you take away all the little remains of wood in the lead. With very smooth and soft little cuts refine the lead until it has no wood. Try not to cut the graphite lead, You may use the back of the knife instead of the cutting edge so to minimize the cuts in the lead.

As you can see the closer to the lead, the littler the wood cuts


Almost finished


       As a final step, you can roll the final lead on a sheet of paper to clean the lead of possible remains.

The final lead

 Close view of the final lead


       Now we have a new graphite lead of the required degree, 2B in this case,  But the lead size is bigger than what the lead holder can use, so we break the lead in halves and use one in the lead holder and the other is tagged and saved for future use.

Too big for the lead holder


Two half's of the original lead


One Half is ready to use and the other is tagged and saved for future use.


       So all; it took was 10 minutes and voila!, we have 2 new leads to draw with the lead holder!


       Do not throw away the bigger wood chops from the first phase, cause i think they can be used to make some little charcoal sticks. ;-)


Enjoy drawing!!


Sunday, August 26, 2012

2mm Leads


       As the pencil ones, the leads for the Lead Holders also use the graphite scale for degrees, but with not so much values in it. As an example one manufacturer produces 19 ranges for wood cased pencils and only 7 for 2mm leads.

Individual 2mm leads


Leads are sold individually, on sets of 2, or packs of 12, and have sizes from 130mm to 90mm.  


Examples of packs of 12 2mm leads


       STAEDTLER® Mars® carbon Leads packs include a colour end cap to fit on the holder for easy lead degree identification. and a place, in the case. to put the original chrome cap, while using the provided colored one.

These leads degrees are  4B - 2B - B - HB - H - 2H - 4H


       As it is difficult to me to get good leads for drawing locally, I have used a procedure to get leads easily. If I have access to good drawing wood cased pencils, then I already have graphite leads available, i just have to take off the wood case. It also enable me to get a wider range of degrees to work with using lead holders, How to get the lead out of the pencil with a procedure i followed when I was in need of a lead on a Sunday afternoon and all stores were closed, will be described in a later article.

       These leads are bigger than the size that the lead holders can manage, so i break them in two, use one in the lead holder, and the other half I tag it, so i can recognize it easily later, and save them, carefully with others half leads i already have.


 Spare Leads of several grades


     Tip: Check the lead size of the pencil, before you buy it, some of the more softer pencils, from some manufacturers, have a lead size bigger than 2mm and they won't fit on the lead holder, this is specially evident in the 6B to 9B range 


Details view of spare leads, tagged for easy degree identification


Enjoy Drawing


Products or brand names are trademarks or registered trademarks of their respective holders.

Sunday, August 19, 2012

Lead holders


Lead holders


        As said before, the difference between a mechanical pencils and a lead holder is that the lead holder have a mechanism to hold the lead in place and the lead needs to be sharpened from time to time.
        Most use 2mm diameter graphite leads, so they replace the wood pencil as the lead is of the same size, other sizes include 5.6mm leads.
        In the lead holder, the length and weight of the drawing tool remains constant all time, making it easy to get used to it, and also obtain a good control of the tool.
          I use mainly 2mm lead holders, some metal ones and some plastic, cheap ones. For detailed work i may use a mechanical-pencil 0.7mm or 0.5mm, but also can use a lead holder with a very sharp lead.


My set of 2mm lead holders


These are my set of lead holders, from top to bottom:

  • STAEDTLER® Mars® technico 780 C with HB lead
  • STAEDTLER® Mars® technico 780 C with 4B lead
  • Stilus - SECOLGRAF 120 with 4H lead
  • MAXIM 1300 with F lead
  • MAXIM 1300 with 2H lead
  • Stilus - SECOLGRAF 120 with B lead
  • MAXIM 1300 with 2B lead

        The Mars® technico are very good as they are made mostly of metal,  have a nice weight and cool touch.  This are the tools i use most to draw. They range from 4H to 4B. They all use 2mm graphite leads. In my local art stores, not much shades are available, mainly HB leads, so i have to get another source for good quality 2mm graphite leads ( more on that later ).

It is funny that the other lead holders are from different brands but seems to be exactly the same model.

 Detail view of the mechanism that holds the lead

 Other detail view of the holder mechanism


In next article we will focus on the leads for these lead holders,
until then enjoy drawing


Wednesday, August 15, 2012

Mechanical Pencils

Mechanical Pencils


These are my mechanical pencils.
From top to bottom:
  1. rOtring Tikky 0.5
  2. rOtring Likky II 0.5
  3. STAEDTLER graphite 777 0.7

     Those are for 0.5mm, 0.5mm and 0.7mm leads, respectively. They are good for detail work, but cause it is difficult for me to find leads different from HB, I do not use them much, I prefer to use a sharp lead-holder to do so. I manage to find some cheap 2B leads 0.7mm for the 777 but they not seem much like 2B, maybe more like B.


Detail view of the leads of my mechanical pencils

        The mechanical pencils have a top cap that can be taken off and gives access to the tube where you can put some leads at the same time, about 2-3 leads. The top cap usually includes a little eraser.


Detail view of a mechanical pencil with a lead and eraser and cap


Another detail view of a different mechanical pencil mechanism with some leads and a bigger blue eraser that sits on top of the cap, making it easier to replace.


Leads


       The mechanical pencils use graphite leads from 0.9mm to 0.3mm size and a range of degrees from 4H to 2B. But what is normally available everywhere is HB leads.

      Manufacturers also started to make colored leads. So you have a more wide range of leads to choose for these mechanical pencils.


Cheap 2B 0.7mm leads

 
Normal HB 0,5mm leads available locally


Next article we will focus on the other type of mechanical pencils, the lead-holder.


Until then, enjoy drawing!